Cooking feels different when a straw broom leans by the pantry and a row of labeled jars glows on the shelf. Witch kitchen decor turns an ordinary counter into a small stage, using black hats, moon garlands, brewing mugs, and amber lamps in place of anything fussy. Some pieces hang on a wall, some fill a tray, and some gather around the coffee maker, so one hook or one shelf is enough to start. Dried herbs, candles, and paper bats keep a spooky kitchen mood going without blocking the stove or the sink. It suits a rented flat as well as a big family kitchen, and every piece packs away easily after Halloween.
1. Broom Wall Display
Two straw brooms cross behind a round white sign on a plain kitchen wall. Gray witch shapes ride across the sign above dark printed lettering. Black pointed boots with pale laces hang at the left beside a wide black hat. Below the sign, a small white shelf holds books, red flowers, and tiny jars. Also, short brooms, small signs, and dried stems fill the edges around the main pieces.
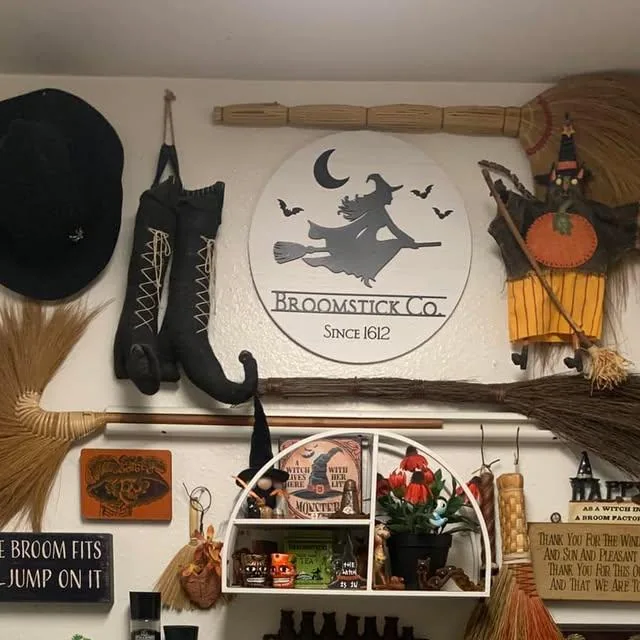
Start with two long handles and bind their straw ends with twine. Mount the pair in an X shape with strong removable hooks. Hang the round plaque in the middle, then set the boots on a nail. Fill the lower shelf with old books, a vase of red blooms, and short jars. Keep heavy pieces near the studs because plaster alone will not hold their weight.
2. Labeled Apothecary Jars
Dark wood shelves hold two rows of tall glass jars with black paper labels. Dried leaves, seeds, and powders fill each jar to a different height. On top, a witch doll in a long dress sits beside a glass cloche and green plant. Carved wood, speckled stone, and a small pumpkin crowd the upper edge. Also, green leaves cover the wall behind the shelves like a thick curtain.
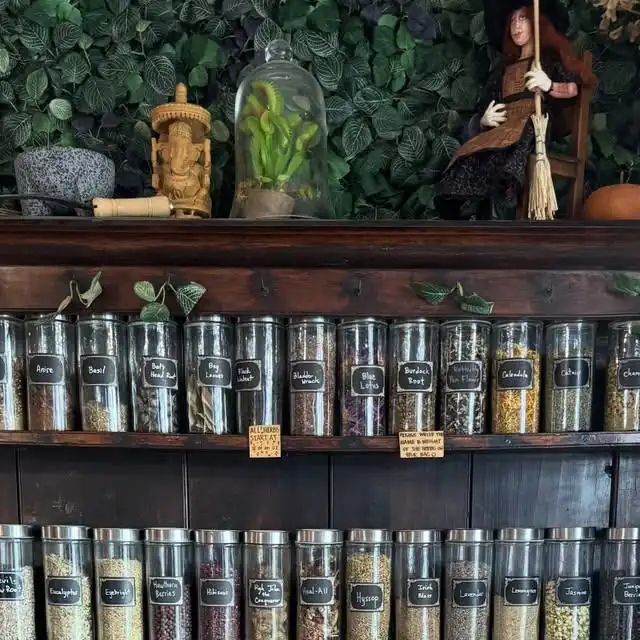
Line the back of a bookcase with dark fabric so the glass stands out. Sort the jars by height, then place the tallest ones at the back. Print small labels on plain paper and stick one on every jar. Set the doll and cloche on top last, because tall items can tip the rows. Dust the lids once a week with a dry cloth to keep labels easy to read.
3. Salt Lamp Glow
Warm light pours from a pink salt rock lamp on a wooden kitchen counter. Beside the lamp, a small pumpkin figure in a black witch hat stands. Orange shades, black trim, and a smiling face cover the tall lamp at the right. Brown square tiles line the wall behind the counter in neat rows. Also, a striped bowl and dark cords sit at the edges of the frame.
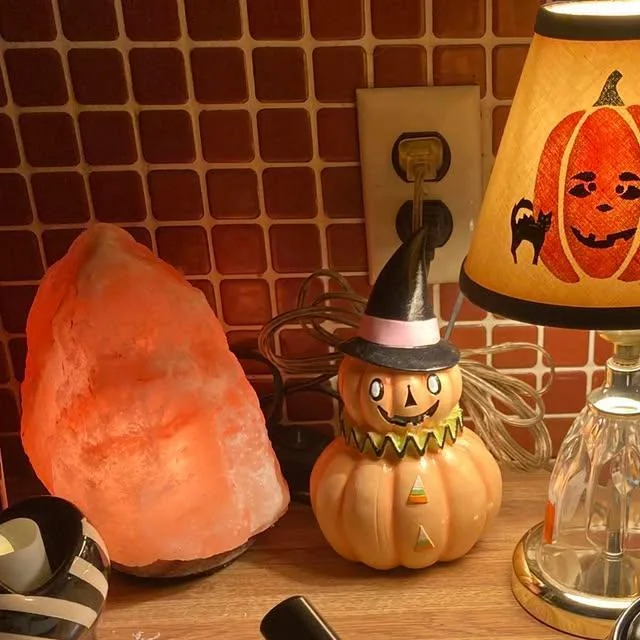
Set the lamp near an outlet, then place the pumpkin figure close beside it. Keep cords tucked behind the counter so the front stays clear for cooking. Use a low-watt bulb in the shade because a hot bulb can crack fabric. Wipe the salt rock with a dry cloth each week to stop dust dulling the glow. Move the small pieces apart if the counter starts to look crowded.
4. Black Hat Shelf
Small shelf boards hold a black witch hat cutout with an orange band. Next to the hat, a glass bottle of red petals stands on the left. Purple, orange, green, and black beads string along the front edge. At the left side, a black skull peers in from the frame. Also, a small bat shape sits below the shelf near the wall.
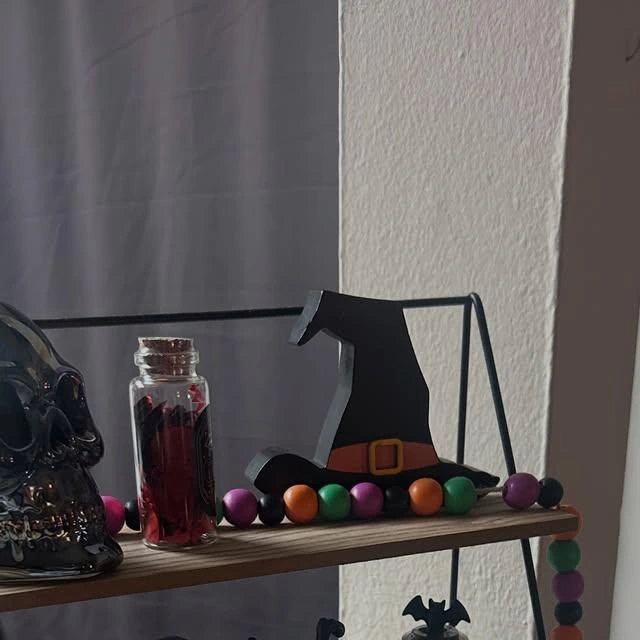
Hang the hat cutout on a short nail, then rest the bottle beside it. Thread the beads on strong cord and let them hang in a neat curve. Keep the skull at one end because a heavy piece can slide off. Space the colors so no two dark beads sit next to each other. Dust the glass once a week with a soft cloth to keep petals bright.
5. Moon Phase Garland
Round wall sign shows a steaming cauldron under the word Potions. Purple leaves and pale stars frame the sign on a dark ground. Black metal moons in every phase curve below the sign on a thin chain. Full disc sits at the center with small crescents on both sides. Also, a white stove stands under the display with a pink curtain at the right.
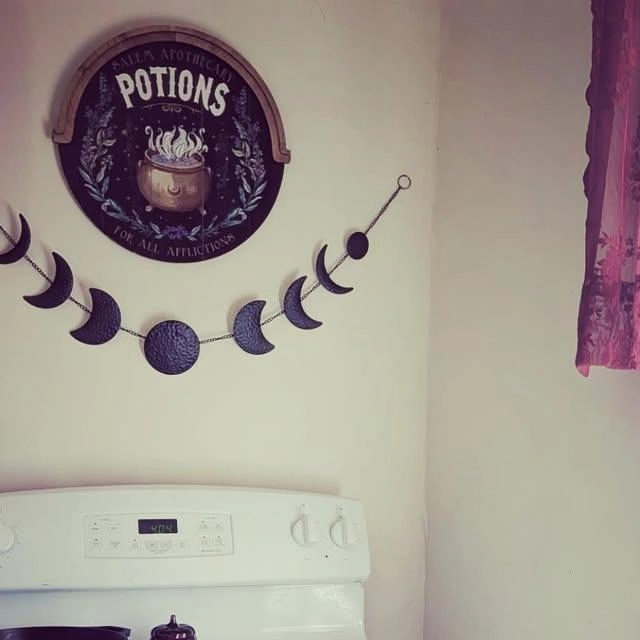
Mark the wall center with a pencil, then hang the sign from one hook. String the moons on their chain so the full disc lands in the middle. Keep the chain level with a small ruler because a sag pulls the eye. Leave space under the garland for the stove knobs and the daily cooking. Wipe the metal once a month with a dry cloth to stop dust dulling it.
6. Kitchen Witchery Shelves
White ladder shelves hold small glass jars with gold lids and amber bottles. On the middle shelf, a leafy green plant grows from a pale yellow pot. Stacked stones with painted words sit on the top shelf near the jars. Leaning on the wall at the left, a tall poster shows a cauldron. Also, dried stems hang from the top beside a small brown tassel.
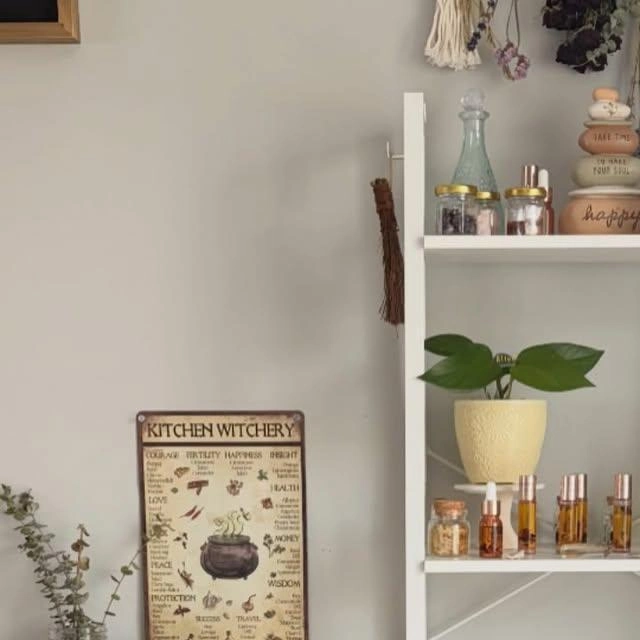
Sort the jars by size, then set the tallest ones on the highest rung. Group the amber bottles together so their color reads as one block. Put the plant where light reaches it because leaves fade fast in shade. Keep the stones away from the edge, and check the poster hook monthly. Dust the lids with a dry cloth to keep the gold bright and glass clear.
7. Hocus Pocus Tray
Black metal tray holds a black mug with gold Hocus Pocus lettering. Behind the mug, a purple potion bottle with a tall pointed stopper stands. At the right end, a small haunted house with red windows sits. Green, black, and orange beads loop around the tray in a loose ring. Also, a green Magic mug and a gray tombstone peek from the lower tier.
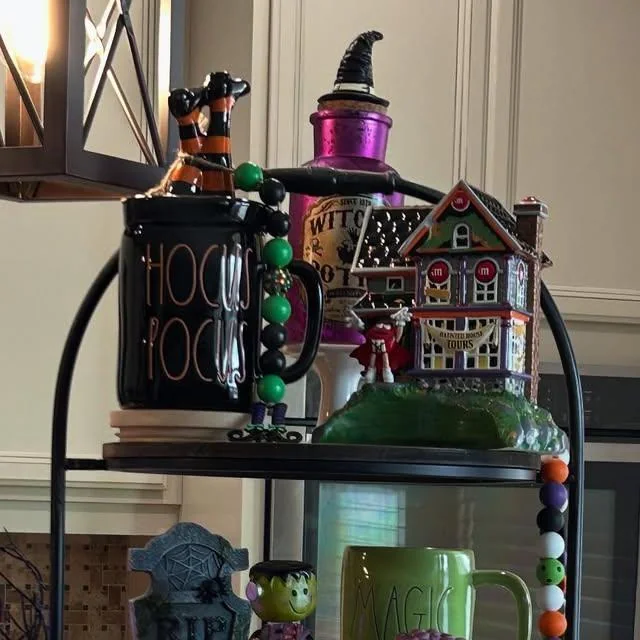
Pick the tallest piece first, then build the rest of the tray around it. Set the mug at the front so the words face out toward the room. Wind the beads along the rim because a loose loop slides off the edge. Keep the bottle away from the rim, and test the tray for wobble first. Wash the mugs by hand with warm water to protect the gold print.
8. Spooky Towel Row
Five Halloween towels hang in a row from hooks on white kitchen cabinets. Pumpkins, a spider, a witch hat, and a small gnome print across the cloth. Orange, green, and black shapes pop against the pale gray fabric. Below, two witch hats and a framed spider picture sit on the gray tile backsplash. Also, a black bat cutout and a small sign peek from the lower edge.
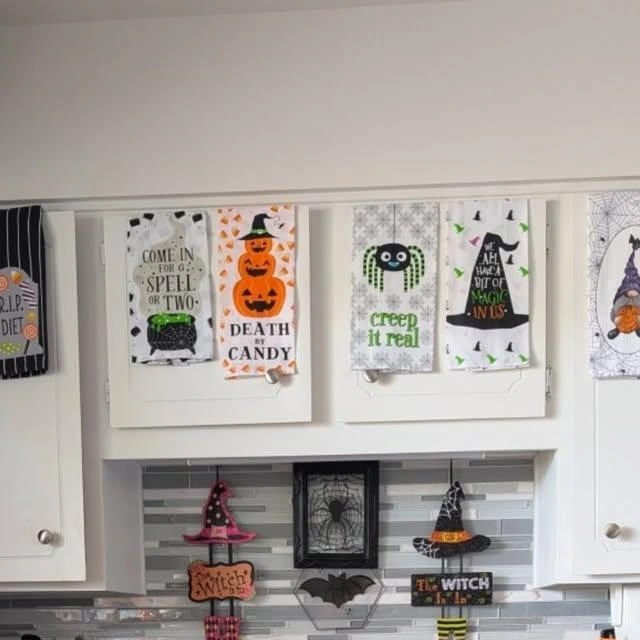
Press the towels flat first, then hang each one from a small hook. Space them evenly so no two busy prints touch each other. Keep the darkest towel in the middle because it anchors the whole row. Tuck the hooks behind the cabinet doors at night to keep the cloth smooth. Wash the towels in cold water with mild soap to keep the colors bright.
9. Hanging Witch Hats
Seven black witch hats hang from thin cords above a bright kitchen island. Each hat points up at a different height over the white counters. Black bat cutouts stick to the cabinet doors in a loose scattered pattern. Rust and cream autumn flowers fill a tray on the counter near the sink. Also, a small skull and a glass dome sit near the sink at the right.
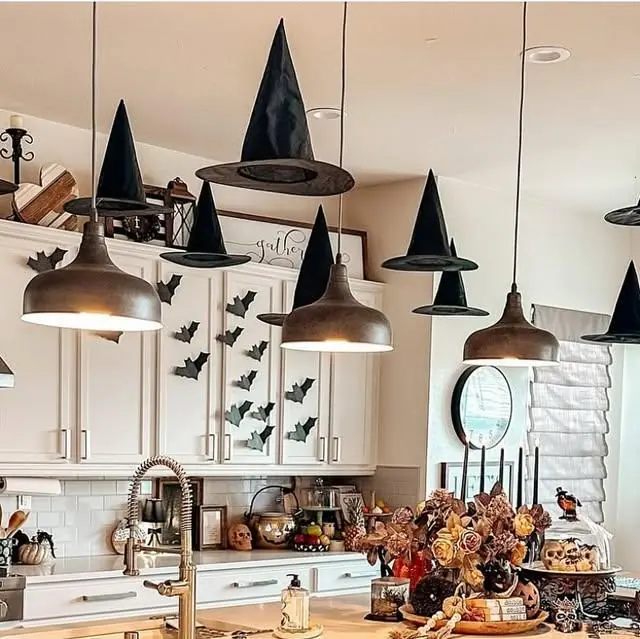
Tie each hat to a clear line, then fix it to the ceiling. Vary the drops so the hats hang at mixed heights above the island. Keep the lines short near the lights because long cords can catch on shades. Stick the bats on the doors with removable pads, and press each one flat. Take the hats down before a storm, and store them flat in a box.
10. Haunted Fridge Decals
Large black decals cover a white fridge under warm wooden kitchen cabinets. Through bare tree branches, a tall haunted house with lit windows rises. Above the house, a wide crescent moon and five bats fill the space. Black birds and thin twigs scatter across the doors in dark shapes. Also, a small bat sits near the handle at the lower right.
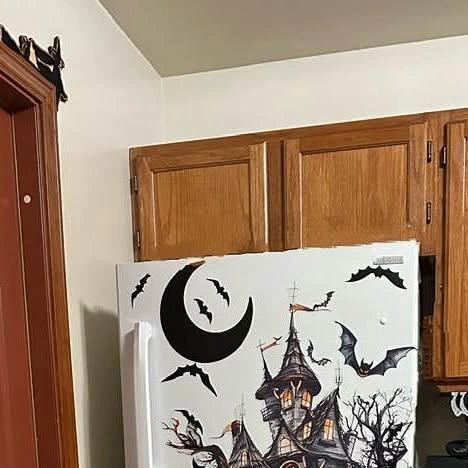
Clean the fridge doors first, then dry them well so the vinyl grips. Place the house decal low on one door, and line the moon up above it. Smooth each piece from the center out because trapped air makes bubbles. Keep the bats clear of the handles, and hands will not peel the edges. Peel a corner up slowly when the season ends to lift the vinyl clean.
11. Bats Across Cabinets
Night falls on a white kitchen where black bats cover the cabinet doors. Jack-o-lanterns glow in a row along the top of the cabinets. Warm string lights run down the side beside a tall black spider web. Orange pumpkins, dark leaves, and red berries crowd the far corner. Also, a skeleton picture hangs on the wall near the stove hood.
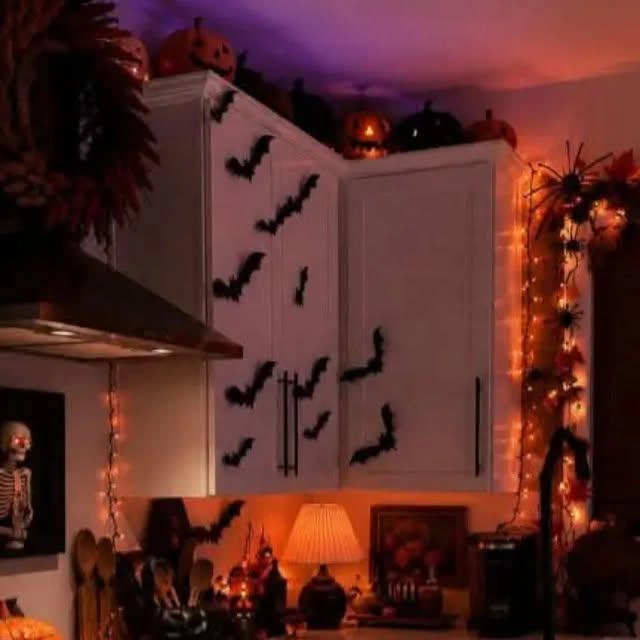
Stick the bats on clean doors, then step back to check the spacing. Mix big and small shapes so the flight looks natural across the fronts. Set the pumpkins on top with space between them because a tight row looks flat. Run the lights along the cabinet edge, and keep plugs clear of the sink. Take the bats down with a slow peel to keep the paint smooth underneath.
12. Netted Doorway View
Beyond a white dining table, black netting drapes a wide kitchen doorway. Across the netting, a bat garland and small bats hang in a loose line. In the far room, a black tree with orange ornaments stands near the shelves. Ghost figures, white pumpkins, and stacked mugs fill the shelves at the right. Also, a red sign with white lettering hangs beside the doorway.
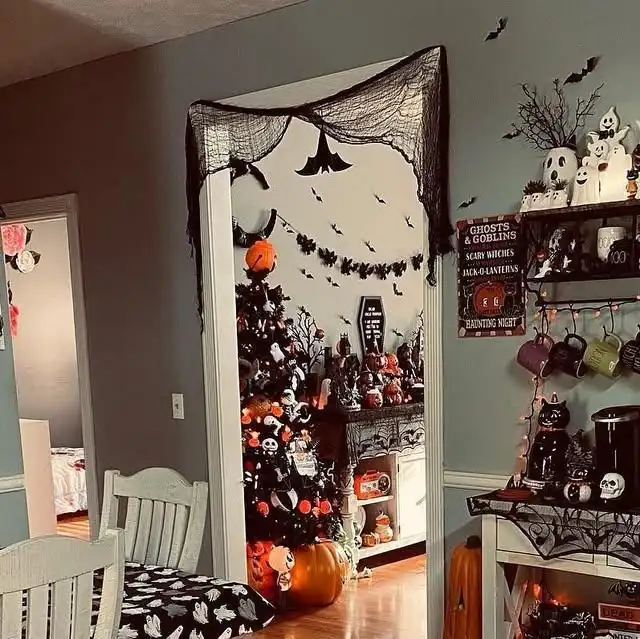
Drape the netting over the door frame first, then pin it at the top corners. Let the edges hang loose so the cloth looks torn and old. Hook the garland high on the frame because a low swag blocks the walkway. Keep the path clear under the netting, and tape any long tails to the trim. Pull the pins out one by one to stop the netting from tearing.
13. Stove Shelf Mugs
Above a steel stove, a wood shelf holds black cauldron pots and pumpkin canisters. Three black-and-white striped mugs hang from hooks under the shelf. At the right end, a bat cutout and a coffin-shaped cat sign sit. Silver glitter coats the wall behind the shelf in a rough bright sheet. Also, a small pumpkin picture with a pointed hat hangs at the far right.
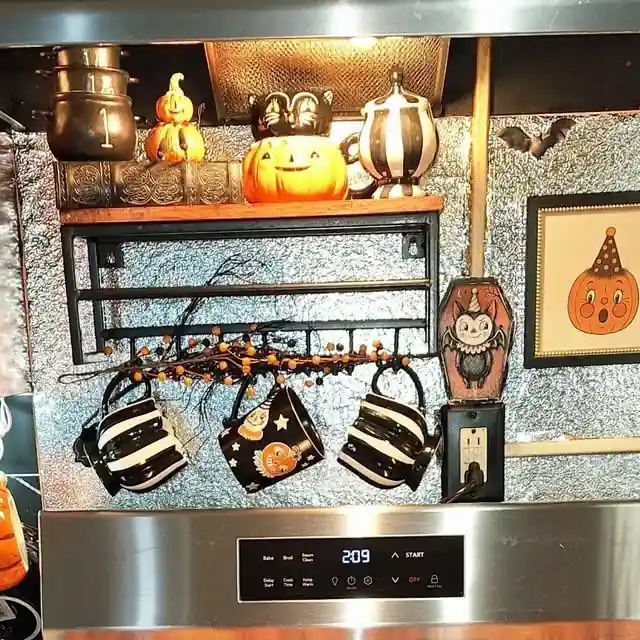
Hook the shelf brackets into studs first, then test them with a firm pull. Set the heavy pots at the back so the front stays light and clear. Hang the mugs by their handles because a hook through the rim can chip them. Keep the sign clear of stove heat, and move it higher if it warps. Wipe the glitter wall with a dry duster to keep the shine even.
14. Ghost and Witch Tray
Upper tier holds a white ghost, a black cauldron, and an orange pumpkin pail. On the lower tier, a green witch head with black hair sits at the left. Small spell books, a purple orb, and a black cat card fill the space. Bare black branches frame the tray on both sides against a plain wall. Also, a small white ghost peeks from behind the card at the right.
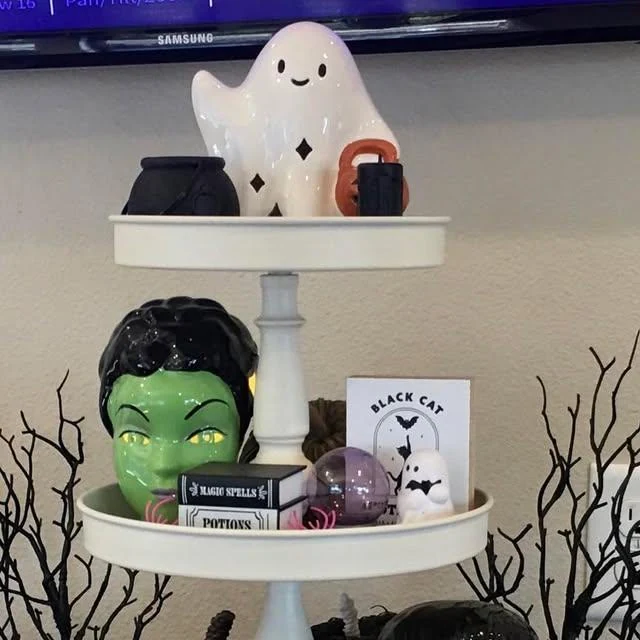
Place the tallest piece at the back, then build the lower tier forward. Set the ghost up front so its face shows from the doorway. Lean the books on their sides because a flat stack hides the covers. Keep the orb away from the rim, and tuck the card behind the head. Dust the tray with a soft brush each week to keep the paint bright.
15. Brewing Coffee Corner
Near a teal wall, a white coffee maker stands on a pale kitchen counter. Under the spout, a black mug reading This Witch Brews Coffee sits. At the left, a red and black coffee box stands with a skull mark. Orange mugs hang on the right beside a red sign with white words. Also, a small ghost sign and a striped shelf sit behind the box.

Brew a test cup first, then set the mug where the spout can reach it. Keep the box closed between uses so the grounds stay fresh longer. Hang the spare mugs on hooks away from the steam because heat can crack glaze. Wipe the counter each morning with a damp cloth to stop coffee rings. Move the sign higher if steam fogs the glass, and check the cord each week.
16. Black Candles Cauldron
Tall black taper candles rise from brass holders on a kitchen island. Beside them, a large black cauldron pot sits with a wooden spoon inside. At the right edge, a white skull with gold details rests. White cabinets and gray tile form a plain backdrop behind the island. Also, a small glass bottle stands far behind the pot near the wall.
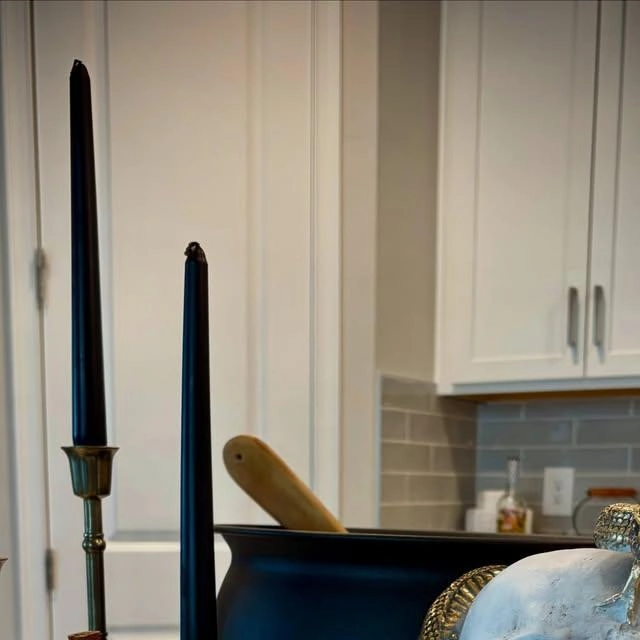
Trim the wicks short before each lighting so the flames stay small and neat. Set the holders on a tray because hot wax can drip onto the counter. Keep the flames clear of the spoon handle, and use flameless candles near kids. Wipe the cauldron dry after washing to stop rust forming on the rim. Store the skull away from the edge, and check the holders for wobble weekly.
17. Dried Herbs Overhead
Thick bunches of dried herbs hang from a metal rod across a dark kitchen. Green, brown, and pale leaves crowd together above a single glowing bulb. Candles and small jars glow faintly on the counter far below. Dark cabinets and a tall chimney shape fill the edges of the frame. Also, thin stems and seed heads droop down through the leaves.

Bundle the stems with twine first, then tie each bunch to the rod. Leave gaps between the bunches so air can move through the leaves. Hang the rod high over the counter because low herbs can brush the food. Check the ties each week, and trim any stems that start to shed. Keep the bundles clear of the stove heat to stop the leaves from drying too fast.
18. Herb Rack Bundles
Rows of glass jars sit on a black metal rack against a wood wall. Gold herb names mark the jars in a loose slanted script. Dried bundles in green and pale gray hang from hooks below the rack. At the left end, a small tassel and a brown cord dangle. Also, a dark sign with pale words shows at the bottom edge.
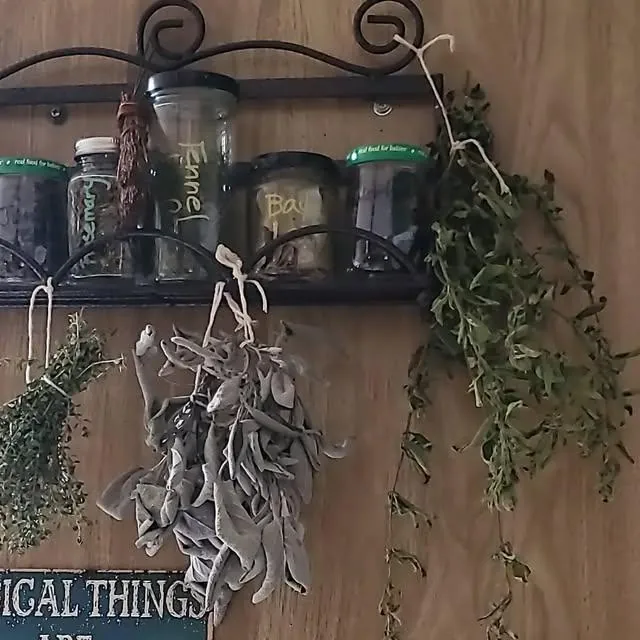
Label each jar with a marker first, then fill it with one herb only. Set the jars in a straight line so the labels read from left to right. Tie the bundles with cotton string because wire can cut the stems. Hang the longest bundles at the ends, and keep the short ones in the middle. Dust the rack with a dry cloth each month to keep the metal bright.
19. Pumpkin Stem Vase
Soft orange pumpkins on thin woody stems rise from a white fluted vase. Red berry branches and dry brown leaves weave between the round pumpkins. Above the vase, a black witch hat hangs against the pale cabinets. Black bat cutouts stick to the cabinet doors in the background. Also, a dark cloth folds over the front edge of the pale counter.
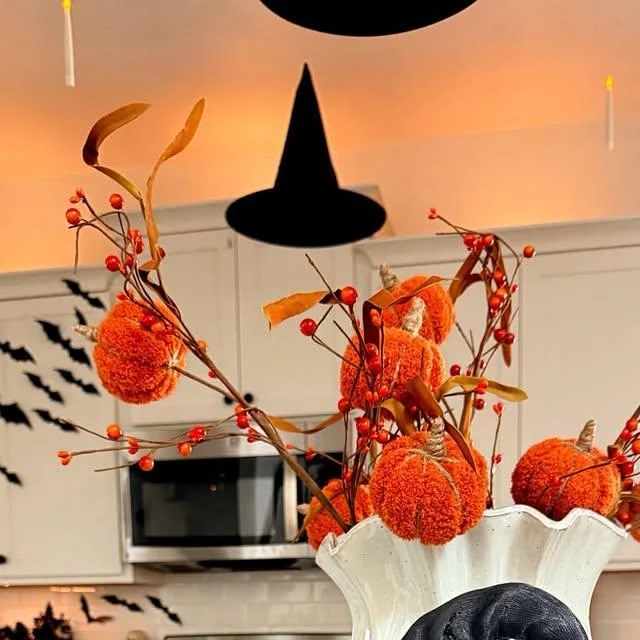
Cut the stems at an angle first, then set them in the vase with water. Mix short and tall stems so the bunch looks full from every side. Tuck the berry branches between the pumpkins because bare gaps show through. Hang the hat from a clear line, and keep it clear of the vase rim. Swap the water every few days to keep the stems firm and the leaves fresh.
20. Laced Boots Display
Paired black boots with bright orange laces stand on a dark counter. Beside the boots, a small tree with glowing jack-o-lanterns rises. Orange berries and thin bare branches fill the tree from top to base. On a stack of old books, a snow globe with a small pumpkin sits. Also, an orange pumpkin with a black face shows at the left edge.
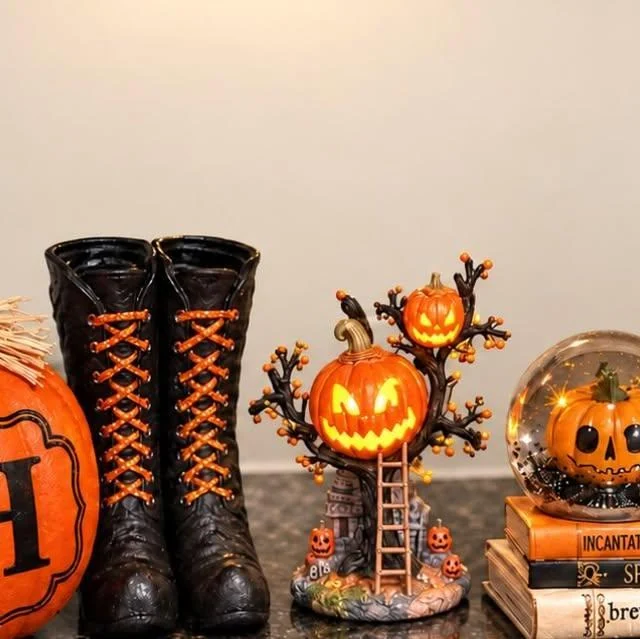
Group the boots at one end first, then set the tree beside them. Lace them loosely so the orange cords show on dark leather. Set the globe on the books because a flat base keeps it from tipping. Keep the lights off during the day, and switch them on at dusk only. Dust the twigs with a soft brush to keep the fruit bright.
21. Skull Hat Tray
Gray witch hat with black feathers crowns a black skull on a tray. Behind the skull, a Potions Brews Elixirs sign stands in bold yellow letters. At the right, a glass bottle labeled Bone Powder sits with a cork stopper. Beside striped straws, a black-and-white fabric pumpkin rests at the front. Also, dark roses and gray leaves fill the lower right corner.
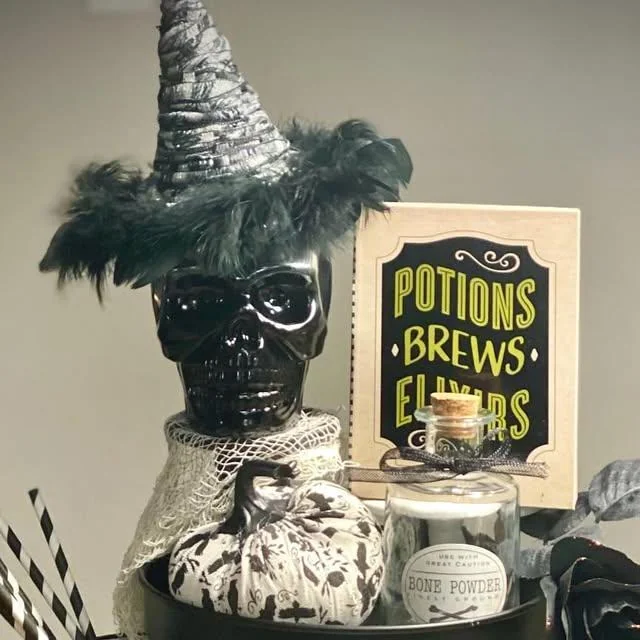
Wrap the hat brim with tape first, then press the feathers into place. Set the skull in the middle so the sign reads over its shoulder. Put the bottle at the front because the cork can roll off a high shelf. Keep the pumpkin clear of the glass, and check the stopper each week. Dust the feathers with a soft brush to keep them full and dark.
22. Witches Brew Sign
Wooden cauldron sign reads Homemade Witches Brew Served Daily in pale letters. Beside the sign, a black oven mitt with a white skeleton hand hangs. At the lower left corner, a dark letter board with white words shows. Metal hooks and a wide wood shelf edge frame the top of the shot. Also, a small black bat shape peeks from the bottom edge.
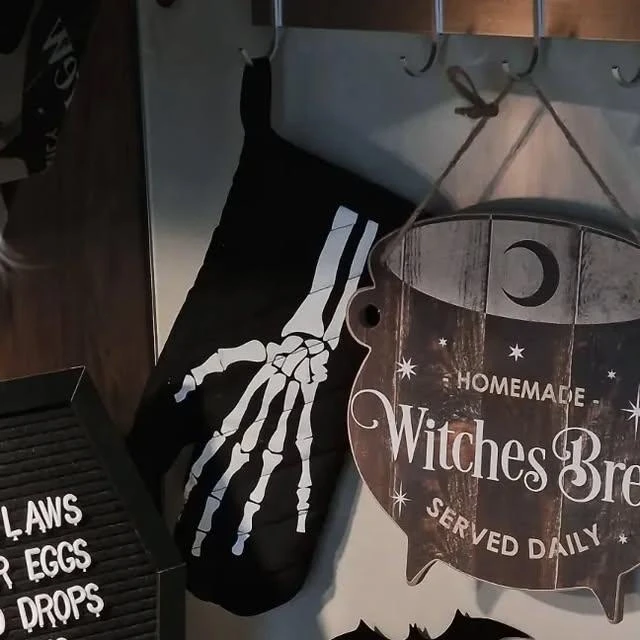
Loop the sign cord over a small nail, then level it with a ruler. Hang the mitt from the hook beside it so both pieces read as one. Keep the board clear of steam because damp felt can warp the letters. Space the hooks wide enough for the mitt, and test each with a tug. Wipe the wood with a dry cloth each week to keep the paint bright.
23. Skeleton Wears Hat
Pale skeleton stands at a white kitchen sink wearing a large black witch hat. Black bat cutouts spread across the white cabinets above the sink. Over the sink, a white fretwork trim crowns the window. Pale tile, steel taps, and wood crates fill the space around the skeleton. Also, a small pink pumpkin and a dark sign sit at the far right.
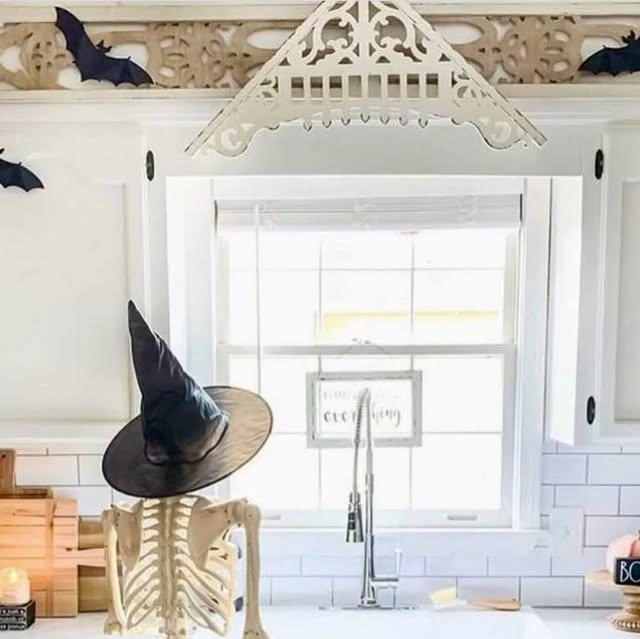
Seat the skeleton on the counter, then set the hat on its head. Tilt the hat low over the eyes so the face reads from the doorway. Stick the bats high on the cabinets because low ones peel off in steam. Keep the bones clear of the taps, and wipe them dry if wet. Store the hat flat after the season, and fold the bats in a box.
24. Witchy Art Corner
Green walls hold framed witch paintings above a wooden cabinet with glass doors. By a sliding door, a straw broom leans beside dried stems and beads. Over a small white statue, a red moon painting hangs on the side wall. Dried herbs, feathers, and small skulls crowd the shelves at the right. Also, a glass bottle and a dark candle sit on a black stand below.
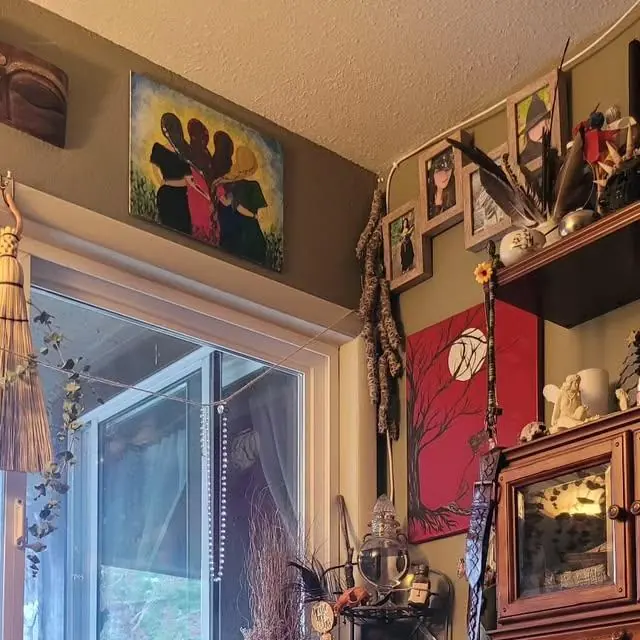
Lean the broom in a corner first, then hang the paintings above it. Group the frames by size so the largest one sits at eye level. Set the statue on a steady shelf because a thin base can tip with ease. Keep the herbs clear of the candle flame, and use a flameless one near them. Dust the frames with a soft brush each month to keep the glass bright.
25. Grinning Doll Display
In front of a white door, a witch doll with white hair grins at the viewer. Dark feathers crown a tall black hat on the doll’s head. Behind the doll, a pale dried-grass wreath hangs on the door. At the left, an October 31 sign and orange leaves mark the wall. Also, a small black bell hangs above the door on a dark bracket.
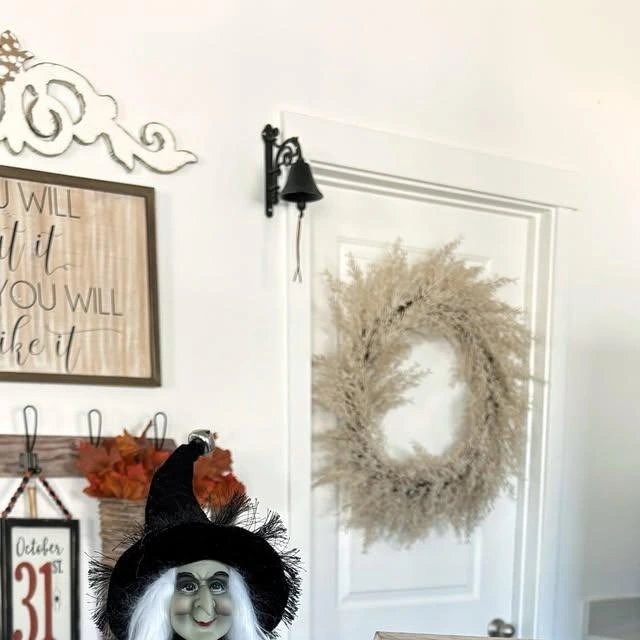
Frame the doll low on a shelf, then set the wreath higher on the door. Keep the hat straight with a pin so it does not slide down. Hang the sign at eye level because a low sign hides behind the doll. Fix the bell bracket with two screws, and test it with a firm tug. Dust the wreath gently with a soft brush to keep the grass pale.
Conclusion
Let one strong piece lead, such as the broom wall, the jar shelf, or the hanging hats, and keep the smaller items quiet around it. Black, orange, and pale wood repeat well, so the room reads as one plan. Witch kitchen decor stays practical when fragile pieces sit high, daily tools stay within reach, and flames are swapped for flameless candles near herbs and cloth. Swap one shelf each season rather than resetting the whole room. A playful witchy corner needs only a few good props, and the stove and sink stay free for real cooking.